ฝ่ายขาย
02-992-7091, 02-992-6358
- ตกแต่งบ้าน
- อุปกรณ์หน้าร้าน
-
เซนเซอร์
- เซนเซอร์ระดับน้ำ
- Load Cell
- Pressure Sensor
- Flow switch
- Fiber optic switch
- เซนเซอร์ก้ามปู
- Vibration Sensor
- Water Flow sensor
- เทอมิสเตอร์
- เทอร์โมคัปเปิล
- สวิทซ์แสง
- สวิทซ์เสียง
- Proximity sensor
- เซนเซอร์ความซื้น
- เซ็นเซอร์ลม
- Pressure Switch
- โฟโต้อิเล็กทริคเซนเซอร์
- เอ็นโค้ดเดอร์
- เซนเซอร์ความชื้น
- เลเซอร์เซนเซอร์
- โมชั่นสวิทซ์
- Gas Sensor
- อัลตร้าโซนิคเซนเซอร์
- สวิทซ์กดติด กดดับ
- Light Curtain Sensor
- เซนเซอร์วัดพลังงานแสง
- อินฟาเรดเซนเซอร์
- Vacuum Sensor
- เซนเซอร์วัดองศา
- LVDT sensor
- Magnet switch
- นิวเมติกส์
- สวิทซ์ไฟฟ้า
- เครื่องวัดสิ่งแวดล้อม
-
เครื่องวัดไฟฟ้า
- โวลต์มิเตอร์
- มัลติมิเตอร์
- กราวด์มิเตอร์
- เครื่องวัดแบตเตอรี่
- Current Transformer
- วัตต์มิเตอร์ไฟกระแสตรง
- มิเตอร์วัดความถี่
- แคมป์ มิเตอร์
- มิเตอร์วัดเฟสไฟฟ้า
- ดิจิตอลแอมป์มิเตอร์
- อนาล็อกแอมป์มิเตอร์
- Current Transducers
- เครื่องวัดฉนวน
- Voltage Tansducer
- มิเตอร์วัดกำลังไฟฟ้า
- Digital Panel Meter
- เครื่องวิเคราะห์แบตเตอรี่
-
วาล์วไฟฟ้า
- วาล์วเพื่อการเกษตร
- อะไหล่มอเตอร์วาล์ว
- มอเตอร์วาล์ว 1/2"
- มอเตอร์วาล์ว 3/4"
- มอเตอร์วาล์ว 1"
- มอเตอร์วาล์ว 1 1/4"
- มอเตอร์วาล์ว 1 1/2"
- มอเตอร์วาล์ว 2"
- มอเตอร์วาล์ว 2 1/2"
- มอเตอร์วาล์ว 3"
- มอเตอร์วาล์ว 4-6"
- โซลินอยด์วาล์ว 1/4
- โซลินอยด์วาล์ว 1/2"
- โซลินอยด์วาล์ว 3/4"
- โซลินอยด์วาล์ว 1 1/4
- โซลินอยด์วาล์ว 1"
- โซลินอยด์ กลไก
- วาล์วผีเสื้อ
- วาล์วผีเสื้อ 2"
- วาล์วผีเสื้อ 2 1/2"
- วาล์วผีเสื้อ 3"
- วาล์วผีเสื้อ 4"
- วาล์วผีเสื้อ >5"
- มอเตอร์วาล์วผีเสื้อ
- โซลินอยด์วาล์วน้ำ
- โซลินอยด์วาล์ว 1/8"
- โซลินอยด์วาล์ว 1 1/2
- โซลินอยด์วาล์ว 2"
- มอเตอร์ไฟฟ้า
- Packing Machine
- See All
หมวดสินค้า
หมวดสินค้า
- บ้านน็อคดาวน์
- อะไหล่ซ่อม
- ตกแต่งบ้าน
-
เครื่องชั่งตวง
- เครื่องชั่งวางพื้น 1 ตัน
- เครื่องชั่งตั้งพื้น 750 kg
- เครื่องชั่งตั้งพื้น 600 kg
- เครื่องชั่งตั้งพื้น 500 kg
- เครื่องชั่งตั้งพื้น 300 kg
- เครื่องชั่งตั้งพื้น 200 kg
- เครื่องชั่งตั้งพื้น 150 kg
- เครื่องชั่งตั้งพื้น 100 kg
- เครื่องชั่งตั้งพื้น 1ตัน
- เครื่องชั่งสปริง
- เครื่องชั่งนับจำนวนตั้งพื้น
- จอแสดงน้ำหนัก
- เครื่องชั่งคำนวณราคาตั้งพื้น
- เครื่องชั่งวิเคราะห์ความชื้น
- เครื่องชั่งตั้งพื้น 60 kg
- เครื่องชั่งตั้งพื้น 30 kg
- เครื่องชั่งตั้งโต๊ะ 60kg
- เครื่องชั่งตั้งโต๊ะ 30kg
- เครื่องชั่งตั้งพื้น 15kg
- เครื่องชั่งตั้งโต๊ะ 7-20kg
- เครื่องชั่งตั้งโต๊ะ 4-6kg
- เครื่องชั่งตั้งโต๊ะ 0.5-3kg
- เครื่องชั่งแลป 0.0001g
- เครื่องชั่งแลป 0.001g
- เครื่องชั่งแลป 0.01g
- ใบรับรอง เครื่องชั่ง
- เครื่องชั่งวางพื้น 500kg
- เครื่องชั่งวางพื้น 2 ตัน
- เครื่องชั่งวางพื้น 3 ตัน
- เครื่องชั่งวางพื้น 5 ตัน
- เครื่องชั่งพื้นสแตนเลส
- เครื่องชั่งพื้นทางลาด
- เครื่องชั่งพกพา
- เครื่องชั่งราคาถูก
- เครื่องชั่งคำนวณราคา
- เครื่องชั่งนับจำนวน
- เครื่องชั่งกันน้ำ
- เครื่องชั่งแบบแขวน
- เครื่องชั่งแบบเข็ม
- เครื่องชั่งน้ำหนักสัตว์เลี้ยง
- เครื่องชั่งน้ำหนักคน
- เครื่องชั่งน้ำหนักพาเลท
- เครื่องชั่งตวงอาหาร
- เครื่องชั่งคานเลื่อน
- ลูกตุ้มน้ำหนัก
- เครื่องชั่งมือสอง
- เครื่องชั่งตั้งพื้นแบบมีเครื่องพิมพ์
- ทางลาดเครื่องชั่ง
- เครื่องชั่ง อะไหล่
- เครื่องชั่งรถบรรทุก
- เครื่องชั่งตั้งโต๊ะแบบมีเครื่องพิมพ์
- แท่นวางเครื่องชั่งตั้งพื้น
- อุปกรณ์หน้าร้าน
- เครื่องวัดของเหลว
-
เครื่องวัดไฟฟ้า
- โวลต์มิเตอร์
- มัลติมิเตอร์
- กราวด์มิเตอร์
- เครื่องวัดแบตเตอรี่
- Current Transformer
- วัตต์มิเตอร์ไฟกระแสตรง
- มิเตอร์วัดความถี่
- แคมป์ มิเตอร์
- มิเตอร์วัดเฟสไฟฟ้า
- ดิจิตอลแอมป์มิเตอร์
- อนาล็อกแอมป์มิเตอร์
- Current Transducers
- เครื่องวัดฉนวน
- Voltage Tansducer
- มิเตอร์วัดกำลังไฟฟ้า
- Digital Panel Meter
- เครื่องวิเคราะห์แบตเตอรี่
- เครื่องวัดสิ่งแวดล้อม
-
เครื่องวัดอุตสาหกรรม
- เครื่องมือวัดขนาด
- กล้องวัดระยะไกล
- Flow Meter
- เครื่องวัดองศา
- เครื่องมือวัดระยะ
- Dial gauge
- เครื่องวัดความแข็ง
- เครื่องมืองานก่อสร้าง
- ไมโครมิเตอร์
- เครื่องวัดความเร็วรอบ
- Digimatic Indicator
- เครื่องวัดความหนาสี
- เครื่องเช็คน้ำมันเบรค
- เครื่องวัดสนามแม่เหล็ก
- เครื่องวัดความหนาโลหะ
- เครื่องมือจิวเวลรี่
- เครื่องวัดฟิล์มกรองแสง
- UV meter
- เครื่องตรวจเช็คสี
- เครื่องวัดแรงบิด
- กล้องจับความร้อน
- Spectrophoto meter
- Gloss Meter
- Haze Meter
-
อุปกรณ์ไฟฟ้า
- อุปกรณ์ตู้คอนโทรล
- Cable Tie
- ฮีตเตอร์ทำความร้อน
- เครื่องมืองานไฟฟ้า
- เครื่องป้องกันไฟตกไฟเกิน
- ไซเรนและบัซเซอร์
- ไฟสัญญาณ
- Noise Filter
- เครื่องพิมพ์สายไฟ
- อุปกรณ์ป้องกันฟ้าผ่า
- ขั้วต่อสายไฟ
- เอซีคอนแทคเตอร์
- เครื่องตรวจสายไฟ
- เครื่องป้องกันไฟตก
- รีเลย์ไฟฟ้า
- โซลิดสเตตรีเลย์
- ขั้วต่อหางปลา
- ป้องกันกระแสไฟเกิน
- เจนเนอเรเตอร์
- คาปาซิเตอร์
- ฮีตเตอร์แท่ง
- DC Voltage Protection
- Circuit-Breaker
- อิเล็กทรอนิกส์
-
อุปกรณ์ควบคุม
- AC Inverter
- จอแสดงค่าสัญญาณ
- สายลิ้งค์ PLC
- ตู้ควบคุมปั๊มน้ำ
- TempController
- เครื่องตั้งเวลา
- ควบคุมแบบไร้สาย
- บลูทูธควบคุมอุปกรณ์
- Electromagnet Lift
- เครื่องนับจำนวน
- ควบคุมผ่านเน็ตเวิร์ค
- บอร์ดควบคุมผ่านคอมพิวเตอร์
- ควบคุมผ่านโทรศัพท์
- Data acquisition module
- เครื่องหน่วงเวลา
- เครื่องควบคุมความชื้น
- Hour Meter
- เครื่องควบคุมระดับน้ำ
-
วาล์วไฟฟ้า
- วาล์วเพื่อการเกษตร
- อะไหล่มอเตอร์วาล์ว
- มอเตอร์วาล์ว 1/2"
- มอเตอร์วาล์ว 3/4"
- มอเตอร์วาล์ว 1"
- มอเตอร์วาล์ว 1 1/4"
- มอเตอร์วาล์ว 1 1/2"
- มอเตอร์วาล์ว 2"
- มอเตอร์วาล์ว 2 1/2"
- มอเตอร์วาล์ว 3"
- มอเตอร์วาล์ว 4-6"
- โซลินอยด์วาล์ว 1/4
- โซลินอยด์วาล์ว 1/2"
- โซลินอยด์วาล์ว 3/4"
- โซลินอยด์วาล์ว 1 1/4
- โซลินอยด์วาล์ว 1"
- โซลินอยด์ กลไก
- วาล์วผีเสื้อ
- วาล์วผีเสื้อ 2"
- วาล์วผีเสื้อ 2 1/2"
- วาล์วผีเสื้อ 3"
- วาล์วผีเสื้อ 4"
- วาล์วผีเสื้อ >5"
- มอเตอร์วาล์วผีเสื้อ
- โซลินอยด์วาล์วน้ำ
- โซลินอยด์วาล์ว 1/8"
- โซลินอยด์วาล์ว 1 1/2
- โซลินอยด์วาล์ว 2"
-
เซนเซอร์
- เซนเซอร์ระดับน้ำ
- Load Cell
- Pressure Sensor
- Flow switch
- Fiber optic switch
- เซนเซอร์ก้ามปู
- Vibration Sensor
- Water Flow sensor
- เทอมิสเตอร์
- เทอร์โมคัปเปิล
- สวิทซ์แสง
- สวิทซ์เสียง
- Proximity sensor
- เซนเซอร์ความซื้น
- เซ็นเซอร์ลม
- Pressure Switch
- โฟโต้อิเล็กทริคเซนเซอร์
- เอ็นโค้ดเดอร์
- เซนเซอร์ความชื้น
- เลเซอร์เซนเซอร์
- โมชั่นสวิทซ์
- Gas Sensor
- อัลตร้าโซนิคเซนเซอร์
- สวิทซ์กดติด กดดับ
- Light Curtain Sensor
- เซนเซอร์วัดพลังงานแสง
- อินฟาเรดเซนเซอร์
- Vacuum Sensor
- เซนเซอร์วัดองศา
- LVDT sensor
- Magnet switch
- สวิทซ์ไฟฟ้า
- มอเตอร์ไฟฟ้า
- นิวเมติกส์
-
อุปกรณ์เครื่องกล
- LM Guide เล็ก
- ผงโลหะ
- พลังงานลม
- Conveyor
- ดอกเจาะ
- แม่เหล็กถาวร
- Endmill
- เครื่องพิมพ์ 3 มิติ
- Shaft Support
- Linear Bushing
- น็อต สกรู
- ถุงมือ ผ้าเช็ดเครื่อง
- ลิเนียร์สเกล
- Linear block bushing
- เครื่องป้อนสกรู
- Laser Marking
- Block Bearing Housing
- Ball Bearing
- Joint Bearing
- อลูมิเนียมโปรไฟล์
- Ball Screw
- Linear Stage
- สุขภาพ
- อุปกรณ์สื่อสาร
- กล้องต่างๆ
-
พลังงานแสงอาทิตย์
- hybrid on/off grid inverter
- ตู้คอมบายเนอร์
- เครื่องทำความสะอาดแผงโซล่าเซลล์
- Inverter Hybrid
- พัดลม โซล่าเซลส์
- โซล่าเซลล์
- อินเวอร์เตอร์ราคาถูก
- Solar Tracking
- เข็มเหล็ก
- โซล่า ชาร์จเจอร์
- โซล่าปั้ม ดีซี
- On Grid อินเวอร์เตอร์
- โซล่าร์โฮม
- โซล่าแบตเตอรี่
- โคมไฟโซล่าเซลล์
- โซล่า คอนเน็คเตอร์
- อินเวอร์เตอร์ปั๊มน้ำ
- ไฮบริด อินเวอร์เตอร์
- ติดตั้งโซล่าเซลล์
- ปั้มน้ำบาดาล
- Off Grid อินเวอร์เตอร์
- ปั้มน้ำหอยโข่ง
- อุปกรณ์ยึดแผงโซล่าเซลล์
- ชุดอินเวอร์เตอร์ปั้มน้ำ
- ฟิวส์โซล่าเซลล์
- MPPT Solar Charger
- ชุดตู้เย็นโซล่าเซลล์
- ชุดปั๊มน้ำ DC Solar cell
- ชุด Mini On Grid Solar Cell
- ชุดปั๊มน้ำ+ควบคุม
-
หลอดไฟLED
- ไฟฉายซูม LED
-
LED Lighting
- ไฟจราจร LED
- LED E27 ราคาถูก
- LED DIY >60W
- LED B15
- หลอดผอม LED
- LED E14
- LED COB
- LED Downlight
- LED PIR
- LED DIY 5-50W
- LED Module
- LED Controller
- โคมไฟ LED Flood
- LED Street
- LED Strip
- LED Ring Light
- LED DIY 1-3W
- LED For Car
- LED G4
- LED For Machine
- LED สุขภัณฑ์
- LED ตกแต่ง
- LED ใต้น้ำ
- LED E27
- LED Tower Lamp
- LED MR16 ราคาถูก
- LED ตู้ปลา
- LED Driver
- LED ไฟแต่งสวน
- โซล่าเซลล์ LED 12V
- LED Heat sink
- LED Lens
- LED PANEL
- แหล่งจ่ายไฟ
- ความปลอดภัย
- เครื่องสแกนลายนิ้วมือ
- Packing Machine
- งานอดิเรก
- อุปกรณ์ไร้สาย
- เกษตรกรรม
- สติกเกอร์
-
เครื่องมือช่าง
- sport
- โอโซนแและออกซิเจน
- LED DIY
- ตู้อบลมร้อน
- ประดับยนต์
- ** สินค้ามือสอง **
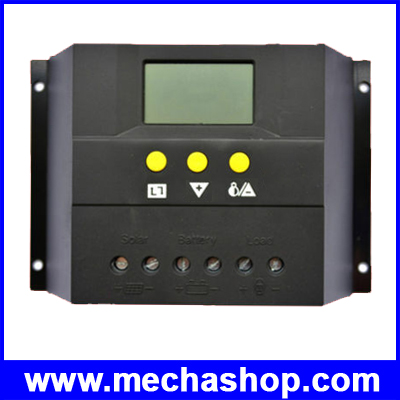
SCC041 : โซล่าชาร์จเจอร์ โซล่าคอนโทรลเลอร์ 80A 12V(1000W) 24V(2000W) Solar Controller PV panel Battery Charge Controller Solar system
2,500 บาท
โซล่าชาร์จเจอร์ โซล่าคอนโทรลเลอร์ 80A 12V(1000W) 24V(2000W) Solar Controller PV panel Battery Charge Controller Solar system
>> เช็คสต๊อคสินค้า <<
โซล่าชาร์จเจอร์ โซล่าคอนโทรลเลอร์เป็นอุปกรณ์อีกชนิดหนึ่งที่มีความสำคัญในการติดตั้งโซล่าเซลล์ ซึ่งโซล่าชาร์เจอร์จะทำหน้าที่ควบคุมการประจุไฟฟ้าที่ได้จากแผงโซล่าเซลล์แล้วเอามาเก็บไว้ที่แบตเตอรรี่ในปริมาณที่เหมาะสม โซล่าชาร์เจอร์ จะคอยควบคุมการจ่ายไฟให้กับโหลดไฟฟ้า เพื่อป้องการความเสียหายที่เกิดจากการประจุไฟในปริมาณที่มากเกินไป หมายเหตุ ห้ามต่ออินเวอร์เตอร์ เข้าโดยตรงกับชาร์จเจอร์ ให้ต่อกับแบตเตอรี่เท่านั้น ข้อมูลสินค้า- Visual LCD graphic symbol
- Brief key operation
- Grade auto switch of system voltage
- Intelligent PWM Charging Mode
- Auto temperature compensation
- Adjustable charging & discharging parameter
- Settable working modes of loads
- Accumulative function of charging & discharging AH
- Protection for battery back discharging
- Protection for battery low voltage
- Overloading & short-circuit protection
- Battery reversed protection
- Delayed auto restart after overloading protection
- Model: 80I
- Rated Current: 80A
- Rated Voltage: 12V/24V
- Maximum Voltage of solar panel: 50V
- Float Voltage: 13.8V/27.6V
- Low Voltage Disconnection: 10.7V/21.4V
- Low Voltage Reconnection: 12.5V/25.0V
- No load loss: <30mA
- loop voltage drop: <200mV
- Charging Mode: PMW Mode
- Temperature Compensation: -4mV/Cell/ °C
Installation
1 Get ready for tools and cables. Advising you to matching the right cables. Ensure that the current density <4A/mm2 that is conductive to reducing the line voltage drop. Recommendation: 30A with 10mm2 cables. Check whether the installation sites compliance with the relevant safety requirements. Please avoid the damp, dusty, there is a place flammable, explosive and corrosive gases use the controller to install.
2 Install the controller into a fixed vertical plane. See section 5 of the pore size and pore spacing. In order to ensure a good thermal control conditions, please set aside each 10cm below the controller space.
3 As shown on the right, connect the (1) Load, (2) Battery and (3) Solar Panel to the controller according to the order of (1) (2) (3). Pay attention to the load, battery, solar panel and controller of same polarity.
4 Put the external temperature sensor into the left of the controller (probe port). The temperature sensor should be placed at the similar space of the battery. (Otherwise, the controller will control the parameters of all wrong temperature compensation.)
5 If you have remote monitoring and control function, please insert one end of the included communication wire on the right of the controller (communication port), the other end to connect to the host computer.
Demolition: To prevent accidents, please order the demolition of solar panels, battery and load disconnect with controller.
Note:Battery polarity will not damage the controller, but you will have a load equipment security risks.
- Installtion cable area: >3# AWG ( 25mm2 )
- Operation temperature: -20 °C ~ 50 °C
- storage temperature: -30 °C ~ 70 °C
- Humidity requirement: <90% , no condensation
- Size: 130mm*188mm*62mm
- Mounting hole spacing: 90 mm 178 mm -- 5
- Weight: 700g
ข้อมูลจำเพาะ
Information on technical characteristics, the delivery set, the country of manufacture and the appearance
of the goods is for reference only and is based on the latest information available at the time of publication.